WLAN
To connect your Puppy to a wireless network take the following steps: Step 1
Click on the "connect" icon on your Desktop, then click "Connect to the Internet by network interface"
.....OR.......
Click on Menu / Setup / Network Wizard

If Puppy recognizes your interface, it will be displayed in the upper portion of the box.
Just click the button for your interface and see step 2 below.
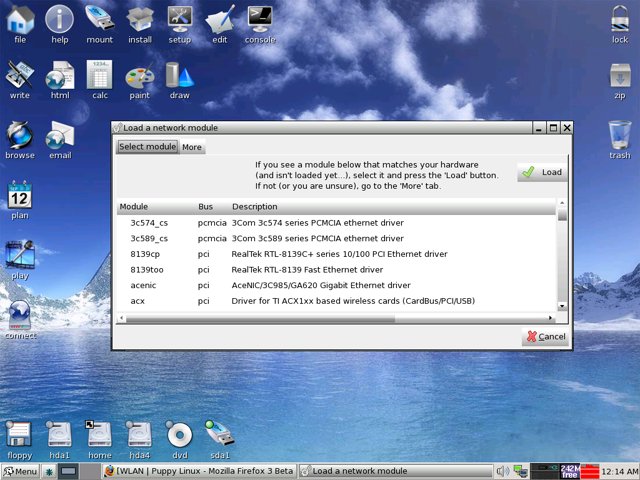
If puppy does not see your interface you will have to load the appropriate module with the Load Module button

If you are unsure, click the "more" tab to Auto-probe drivers, or to install a Windows driver.
After you have loaded the correct module for your interface, it will show up in the first box seen above.
Click on it and proceed to step 2
Step 2
Configuring Network Interface

Click the Wireless button

Click Scan ( Or enter the information for your interface if you know it)
Click on your Network from the list that appears . Click Save. Enter your WEP / WPA key if on a secured network.
Then click Use This Profile. Click the Test button to see if Puppy see`s a "live" connection. If it does, then click
Auto DHCP. If successful Puppy will ask you if you want to save the configuration for next boot. Choose yes or no.
Click Done on the box that appears, and you`re all set!
To connect your Puppy to a wireless network take the following steps: Step 1
Click on the "connect" icon on your Desktop, then click "Connect to the Internet by network interface"
.....OR.......
Click on Menu / Setup / Network Wizard

If Puppy recognizes your interface, it will be displayed in the upper portion of the box.
Just click the button for your interface and see step 2 below.
If puppy does not see your interface you will have to load the appropriate module with the Load Module button

If you are unsure, click the "more" tab to Auto-probe drivers, or to install a Windows driver.
After you have loaded the correct module for your interface, it will show up in the first box seen above.
Click on it and proceed to step 2
Step 2
Configuring Network Interface

Click the Wireless button

Click Scan ( Or enter the information for your interface if you know it)
Click on your Network from the list that appears . Click Save. Enter your WEP / WPA key if on a secured network.
Then click Use This Profile. Click the Test button to see if Puppy see`s a "live" connection. If it does, then click
Auto DHCP. If successful Puppy will ask you if you want to save the configuration for next boot. Choose yes or no.
Click Done on the box that appears, and you`re all set!
- 适合打印的版本
- 15854 次点击

要连接Puppy到无线网路请遵循下面步骤:
步骤1
单击桌面上的”连接“("connet")图标,接着点击”通过网络接口连接到网络“("Connect to Internet by network interface")
...或者...
单击 菜单/设置/网络向导 (Menu/Setup/Network Wizard)
如果Puppy认识你的接口,它将会显示在框体的上部。
单击接口的按钮并看步骤2.
如果Puppy没有发现你的接口,你将需要使用加载模块按钮来加载相应的模块。
如果你不确定,单击”更多“("More")选项卡来自动探测驱动,或者安装一个windows驱动。
在为你的接口加载正确的模块后,它将会显示在前面看到的第一个框体中。
单击它来执行步骤2。
步骤2
配置网络接口。
单击无线按钮。
单击扫描(或者如果你知道它的话,输入你的接口信息)
单击显示出来的列表中你的网络。单击保存。如果是个加密网络,输入你的WEP/WPA密钥。
然后单击使用此配置。单击测试按钮来看看Puppy发现的是不是一个活动的连接。如果不是,单击自动DHCP。如果成功pupp会询问是否为下次启动保存该配置。选择是或否。
单击完成,你已完成所以设置。
我的无线网还不广播
网吧就是手动的
猫灯就是ADSL拨号上网。
网上有用wpa_supplicant来进行配置的,
把/etc里的wpa_supplicant.conf 改了一遍
# iwconfig
lo no wireless extensions.
wlan0 IEEE 802.11g ESSID:"200-6-503"
Mode:Managed Frequency:2.437 GHz Access Point: 1C:AF:F7:54:5D:5C
Bit Rate=72 Mb/s Tx-Power:32 dBm
RTS thr:2347 B Fragment thr:2346 B
Encryption key:off
Power Management:off
Link Quality:79/100 Signal level:-45 dBm Noise level:-96 dBm
Rx invalid nwid:0 Rx invalid crypt:0 Rx invalid frag:0
Tx excessive retries:0 Invalid misc:0 Missed beacon:0
已经获得AP了,但就是连不上,没IP。
到底是可用WPA2网络不?
我是用ndiswarpper驱动的网卡!!!
你可以先自己猜几个IP登上去再进路由修改好就行了。
发表新评论